Showing posts with label Kid crafts. Show all posts

Tuesday, June 3, 2014

Homemade Organic Sunscreen

My son has a difficult time with sunscreen being applied to his face.  It bothers him and has since he was little.  I do not use traditional sunscreens because of all the toxic chemicals that get absorbed into your skin - if you think about it, all the healthy, organic, non gmo eating we do makes no difference if we rub chemicals on our skin and it gets absorbed into our bloodstream.  I also read that traditional sunscreens can do more damage to our bodies (cancer, hormone disruption, etc.) than the sun exposure!  My son responds worst when I rub sunscreen on his face with my hands.  The stick type is the best way for me to apply it on him.  Living here in the "Sunshine" state means we are exposed to the sun a lot and need to find a good way to keep him safe from too much exposure.

I've been wanting to make my own sunscreen for the past year but our apt wasn't the best place to do a lot of those crafty type of things.  I finally ordered all my ingredients and tried it out last night.  Sorry for the terrible lighting, it was after dark and I was stuck with artificial light.  The tubes aren't red - just a reflection of color off the mold.

I am so pleased with the way these turned out!  The sticks are for my kids' faces and instead of going on with difficulty as do many mineral based sunscreen sticks, these glide right on.  They also do not make my kids faces turn ghostly white.  It will make putting sunscreen on Little Man's face so much easier.  I had been splurging for Aubry, California Baby and Kiss My Face which have been approved by the EWG's Guide to Sunscreens as safe to use, but this recipe is just as safe and a whole lot cheaper!  

I purchased the empty deodorant tubes to use as sticks from Amazon.  They weren't cheap, but I think they will be worthwhile for my kids.  I plan to reuse them as we run out.  If you want to make a lotion bar like the heart shaped one above, you will need a silicone mold.  

After much research, these are the ingredients I used and why:
1/3 c. melted organic virgin Coconut Oil – has an SPF of around 8. 
1/3 c. organic Shea Butter – contains cinnamic acid, which absorbs UVB rays. It is generally thought to have an SPF of around 6.
1/2 c. tightly packed organic Beeswax – main purpose in this bar is to hold everything together, it is considered by some skin care companies to have antioxidant and moisturizing properties
2 T plus 1 1/2 tsp. Zinc Oxide – non nano & uncoated zinc oxide so that it isn’t absorbed into the skin
SPF FYI:
SPF 100 blocks 99% of UVB rays, while SPF 50 blocks 98%.  SPF 30 blocks 96.7%, SPF 15 blocks 93%.  When deciding how much zinc oxide to add, anywhere from 5-20% of the total solution is often used.  A higher number does not mean it's better!  More info on SPF HERE

Directions:
Melt the coconut oil, shea butter and beeswax in a double boiler.  Once melted, remove from heat and add zinc.  You may also add essential oils and/or vitamin E at this time.  I added lavender because it was the only non-citrus oil I had on hand.  Do NOT use citrus oils because it is believed to be phototoxic or make the skin more sensitive to the sun.  Carrot seed oil is a great oil to add to sunscreen because it is believed to have a natural spf of 38-40.  I plan to get some to add to my next batch.  FYI - these sunscreens will melt on a hot sunny day in your bag so you will want to keep them in a cool place and apply before they go out and reapply as desired.  For our days at the beach, I plan to take an ice pack along for the sunscreen so we can use it as needed.

We've also made our own organic lip balm.  If your little girl is anything like mine, she thinks lip gloss/lip stick is the next best thing to sliced bread.  We all know that much of that ends up in their mouth so I decided that if she had a hand in making, it as well as a say in the "flavor" (aka essential oil), she'd prefer the natural kind over the store bought toxic junk.  Thankfully I was right about that and she LOVES our homemade, organic lip balm and I don't have to worry about it absorbing toxins in her body.

Photobucket

Sunday, December 4, 2011

Gingerbread Houses

Kendall and I invited a few of her little girlfriends over to decorate gingerbread houses.  I had made the houses in advance so that way the girls could just decorate them without waiting for them to be built.  We made them out of graham crackers which was a great shortcut!  The girls had so much fun and I think the moms did too!

Brynn with her beautiful house

All four of the girls gingerbread houses


Nat Nat's house

Paigey's house

The front of Kendall's house

The back of Kendall's house

Kendall showing us how proud she was of her creation!

Kendall and I are so thankful for such wonderful girlfriends here in Utah.  The best part is when your kids' friends' parents are also your friends.  We try to get these girls together every few weeks and do something special.  Next week the girls are going to a dance recital to see if they want to all do ballet together...I think for Natalie and Kendall it's a no brainer because they use to do ballet together, but we're hoping Paige will join them!  They are such sweet little friends!

Photobucket

Sunday, June 12, 2011

The Biggest Thriller is a Caterpillar...

"...I like the way they creep!"

If you aren't blessed with a little boy who loves all things tractor, then you probably don't recognize that song from the "I Love Cat Machines" movie.  Today Riley chose to watch this movie this morning and then got inspired to color some pictures in his tractor coloring book.  Sadly, the coloring book is a John Deere book so this is what he did to make it the way he wanted the tractor to look:


He wrote CAT across the John Deere and made sure to color it YELLOW!  This one's for you Pappy!  ;)


Photobucket

Tuesday, March 15, 2011

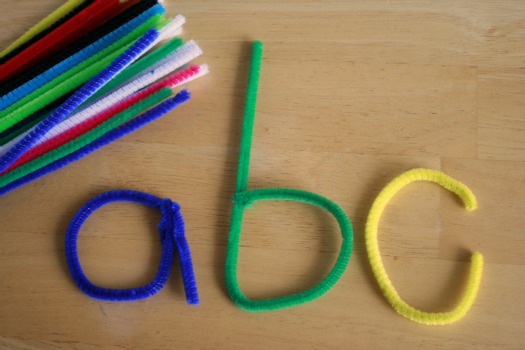
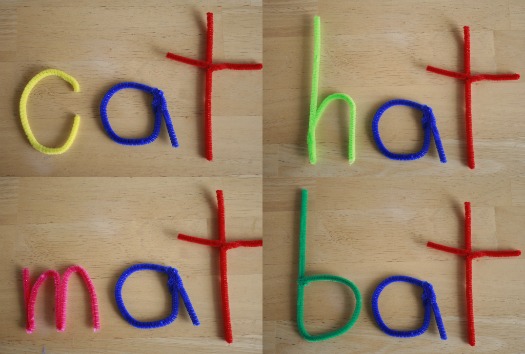
New Ideas For Teaching The ABC's

Make and Takes has a great idea for helping you teach your child her ABC's.  She suggested using pipe cleaners!  What a great idea!


For more info on this and other great ideas from Make and Take, click HERE
 

Have fun!
Photobucket

Wednesday, March 2, 2011

The Letter D

This morning Kendall and I took a field trip to the donut store (aka Beyond Glaze) for our D snack to go along with out letter of the week.  The girl was in sugar heaven!  Of course she picked out all the donuts that had pink icing on them!  We ate our snack at the store because she was too impatient to wait until we got home!
Here is Kendall eating a peanut butter raspberry donut that tastes just like PB&J!  

Then we came home and worked on our craft to go along with the letter of the week:
It's a duck for the letter D!  

Afterwards we read the book called Duck Soup which is about a duck named Max who likes to cook.  He leaves his pot of soup on the stove while he goes out to the garden to get some herbs to complete his soup.  In the meantime his friends enter the house and can't find him so they assume Max has fallen into the pot of soup! 

Now if Disney came up with a princess for each letter of the alphabet, then we'd have a movie to watch with the letter D too!  Who knew learning your ABC's could be so much fun (and so delicious!)


Photobucket

Thursday, February 24, 2011

Anticipating More Snow...

We're supposed to wake up to snow falling and 1-3 inches by the time we leave for school.  It should last through the two days...Just perfect for my skiing friend date with Kevin on Sunday!  Kendall begged me for an art project this afternoon and with her knowing that we bought miniature marshmellows this morning specifically for an art project, I had a hard time saying no.

Here's what we did...based on a project we did at my friend Stacy's house a month or so ago.

I drew the shape and arms, eyes, hat, etc. and then we used Elmer's glue and she placed the "marshies" on the glue.  I was surprised that more ended up on Frosty than in her mouth!

She wanted to do more so we created a snowflake!

My little crafter...following in her Momma's craftaholic footsteps!

I LOVE IT!

Photobucket

Tuesday, February 22, 2011

Letter Of The Week:

This week is the letter "C."  So today's art project was a letter C in the form of a caterpillar!


We also read the Hungry Little Caterpillar and ate chicken nuggets for lunch!  Got to start planning for letter D next week!  Maybe a field trip to Beyond Glaze for donuts?  Sounds like a delicious idea!


Photobucket

Wednesday, February 16, 2011

Artist in Residence

Painting is Kendall's newest passion.  She asks to do it daily and appears to need no help with her brush, water, etc.  Since she's a typically messy kid, I make her strip down...need to remember to pick up another art smock at Ikea the next time I'm there!  Even with washable paint, she still manages to make a mess!


I even splurged and got her a new easel from Ikea because she loves painting so much ($15 so not too much of a splurge) but this one has a spot for our roll of paper to attach to it.  Our old Little Tykes easel still works, but I kept having to cut paper to fit and then tape it down around it...I think I'll give that one away or keep it outside for messy finger pudding paint this summer!

Photobucket

The B Says Buzz!

The letter of the week is "B."  So today's art project was to create a bee in the form of the letter B.

Here's my little princess (yes, she's often found in her Rapunzel dress while at home - the thing has so many rips and tears, but she doesn't care!) making her art project.  She has been loving the time spent being creative while learning about her letters and sounds.

I never cease to be amazed by her fine motor coordination...I guess compared to Riley, she seems so advanced!  (For those of you who don't know, Riley's fine motor skills were as weak as could be without qualifying him for services when he received speech therapy as a toddler.)

Here she is putting black stripes on her bee - she did help cut some of the stripes, but Momma had to make the longer ones.

Bees have to have antenna and eyes as well as a purple stinger!

Ta Da!

And what kind of teacher would I "bee" if I didn't include a snack that starts with the letter B?  Yum!


Photobucket

Sunday, February 13, 2011

Happy Heart Day!

Just a few of the ways we celebrate Valentine's Day here at the Chunko House...

Handmade Valentine's for Riley's classmates...Super easy to do and hopefully original.  I cut the envelopes out with my cricut as well as the hearts, glued it all together and inserted a package of pop rocks!

I just finished this Saturday night...Just in time for Valentine's day, right?  Whew!  Not as perfect as I would have liked, but not bad for a first attempt.  The heart on this shirt is made from strips of ruffled cotton that I cut from an old shirt of Riley's.  

And who doesn't love red velvet whoopie pies in a heart shape served up on a heart shaped plate?  Breakfast will also be heart shaped pancakes served on these same plates!

Normally I don't like to do a lot of candy with the kids so we'll spend time reading about Valentine's day (Kendall loves her Valentine "Fancy Fancy" book she got from my parents) as well as doing things that show others how much we love them!  Kendall and I are also going to decorate cookies with MOMS Club for Valentine's day with some of her friends while Riley has a fun party at school.  Then Andy and I are taking advantage of inexpensive babysitting at church for the night.  For both kids, from 5:30-9pm, it will cost us $20!  Can't beat that!  What a great fund raiser for the youth!  I think we're going to grab dinner and do a little shopping!  Our "real" date night will be next Friday - dinner at Tuscany!  I've been wanting to go there since my friend in Jax (who grew up in Sandy) told me about it before we moved here!

Hope you all have a wonderful Valentine's Day!

Photobucket

Thursday, February 10, 2011

Art Project

So, I posted about starting the Letter of the Week with Kendall and I actually started it today!  Kendall had so much fun working on her "project."  She's so proud of herself and it was a blast to do together.  She really enjoys coloring, painting and cutting paper.

Here are some pictures of our little artist at work:
Practicing her painting skills while her letter A is drying.

We ended up getting the easel out of the basement to make it easier for her to  paint.

Gluing the back of her letter A

Putting the alligator's teeth on her A.

Trying to get the google eyes to stick to the paper instead of sticking to her fingers!

Alligator starts with A!

She had so much fun that I need to be more disciplined to do at least one art project with her each week if not more.  We hung this project in the playroom from our artwork wire.  She was so proud of it and can't wait for Daddy to come home and see what she's done!

Photobucket

Wednesday, February 9, 2011

Can't Wait To Try...

I've had the best of intentions of working on a letter of the week with Kendall, but as always with my best laid plans, it never seems to work out the way I plan...A few months back I shared one of my new favorite blogs on Facebook.  It's called No Time For Flashcards.  On this site are lots of wonderful ideas of things to do with your kids.

My new plan is to create these letters in advance - or at least a few weeks in advance and have them on hand to do with Sissy.  She's been doing well with learning her letters and their sounds so now seems as good a time as any to get started with these craft projects!

Here's the plan.  We'll start at the very beginning (a very good place to start!).  Sorry, got carried away there!  We'll work on the letter A by creating this picture:

You draw the A on the paper and have them color it, then cut it out and glue on the teeth and eyes!  How fun!


You can also make an apple tree to go along with the letter A!
They also offer ideas on books to read to go along with the letter of the week as well as other projects to work on...

Someone remind me why I signed my daughter up for preschool next year?  Oh that's, right to have a few hours of peace two times a week!  She's excited about the idea of going to Riley's school next year anyway.  She has told Riley very specifically that she will be going to HER class next year and he will be going to HIS class!  


Photobucket

Tuesday, November 2, 2010

More Thankful Ideas...

After I posted yesterday's Thanksgiving ideas, I came across a few more that I thought I'd share...

I don't know where I snagged this picture...someone's blog last year and I've archived it for future projects so I can't give credit where credit is due, but I think these shirts are adorable:


You have to cut out the hand shape from the tee shirt and then use material from the underside and stitch around the opening.  What a fun idea.  I have an orange shirt for Riley just waiting for a project like this one!

Here is another cute shirt idea to celebrate Thanksgiving.  This one might require a little more work, but it looks like it would be worth the effort!


The details for this turkey shirt can be found at Treasures for Tots.  According to the tutorial, you don't actually have to sew this one, I believe they just used Heat and Bond...I still like to sew around my appliques to make sure they don't start to peel off at the edges.

I also found this at Better Homes and Gardens website:


How adorable would that look on your dining room table?  So cute and simple to make!

Last year we made these to send out as cards to our family members:


The larger hand is Riley's and the smaller hand is Kendall's.  What a great way to show everyone how big they are getting!

This is another take on that same idea...This one just uses feet as well as the handprints.  I found the idea at Crafts Kaboose:


So many projects...so little time...Maybe if I weren't such a craftaholic I would have a cleaner, more organized house?  Yeah, right!

Happy Crafting!

Photobucket